Steam curls up from the valve and your stomach starts talking back. You spot that little hiss as the pressure build begins, and it kinda makes you feel like the dinner gods are on your side that night. The sealing ring does its job, holding all that power safe and sound inside the pot. You hold your breath a bit as the timer ticks down and that valve shifts into natural release mode.

By the time you lift the lid, your kitchen smells like a warm hug. The cheesy, bacony goodness mixed with that tangy ranch dressing fills the air. You gotta admit, there’s nothing quite like the simple pleasure of a sub sandwich that took just minutes to pull together but tastes like you slaved all day over it.
You notice the fresh crispness of Boston lettuce and juicy tomato slices rounding out the layers of chicken and bacon nestled warm under melted cheddar. This pressure cooker chicken bacon ranch sub is not just dinner, it’s a remedy for busy days, a farmhouse style treat that feeds your soul more than just your appetite.
Why This Recipe Works Every Single Time
- You get perfectly cooked chicken that’s juicy thanks to the gentle pressure build inside your cooker.
- Bacon comes out crisp but not burnt cause it’s layered right, balancing flavors like a pro.
- Ranch dressing melds in with cheese during the warm bake making everything creamy and rich.
- Buns toast just enough to get a light crunch without drying out the whole sandwich.
- Using pre-cooked bacon strips saves you time but keeps that smoky hit front and center.
- Fresh tomato and lettuce thrown on after baking give the bite a crisp, fresh contrast you’ll love.
What Goes Into the Pot Today
- 2 foot long sub buns ready to soak up all those flavors without falling apart.
- 8 ounces of sliced chicken—perfectly sized to cover the buns evenly and stay tender in your pressure cooker.
- 4 ounces of bacon (8 pre-cooked strips)—no standing at the stove watching bacon sizzle means bonus points.
- ⅓ cup ranch dressing that brings tangy creaminess to every bite.
- 8 slices sharp cheddar cheese because everything needs a melty cheese layer.
- 1 ripe tomato sliced thin for that juicy, fresh pop post-bake.
- Half head of Boston lettuce washed and crisp for that cool crunch.
- A bit of seasoning if you like—salt and pepper will do just fine.
- Optional dash of garlic powder if you want a little extra zing.
- Butter or olive oil to lightly toast those buns in the oven.

How It All Comes Together Step by Step
First, get your oven preheated to 350°F. You gotta warm that joint up so the buns toast just right.
Cut the foot-long subs in half lengthwise. Lay ’em flat on a baking sheet, ready to be loaded up with all your goodies.
Next, spread the sliced chicken evenly on the bottom halves of your subs. This is gonna be the cozy bed for everything else.
Lay down those bacon strips over the chicken. The crispness from the pre-cooked bacon works real good here, nothing soggy allowed.
Slather the ranch dressing over the bacon, making sure every inch gets a creamy kiss. Then, cover with the sharp cheddar slices. The cheese is what bonds this all together when it bakes.
Pop the tray into that hot oven for about 15 minutes or until cheese is melted and bubbling just right. While it bakes, slice up that tomato and rinse your Boston lettuce. When the timer goes off, take subs out and top ’em up with fresh tomato and lettuce.
Close the subs and slice them in half before serving. You’ll wanna share, but hey, no judgment if you eat the whole thing yourself.
Quick Tricks That Save Your Time
- Grab pre-cooked bacon strips to skip frying bacon and save time around the kitchen.
- Use day-old buns; they toast better and hold up under the sauce and cheese without getting soggy.
- Pre-slice your tomatoes and lettuce the night before to make assembly fly at dinner time.
- Warm ranch dressing slightly so it spreads easier over the bacon and chicken.
- Line your baking sheet with parchment paper for faster cleanup—it just works.
That First Bite Moment
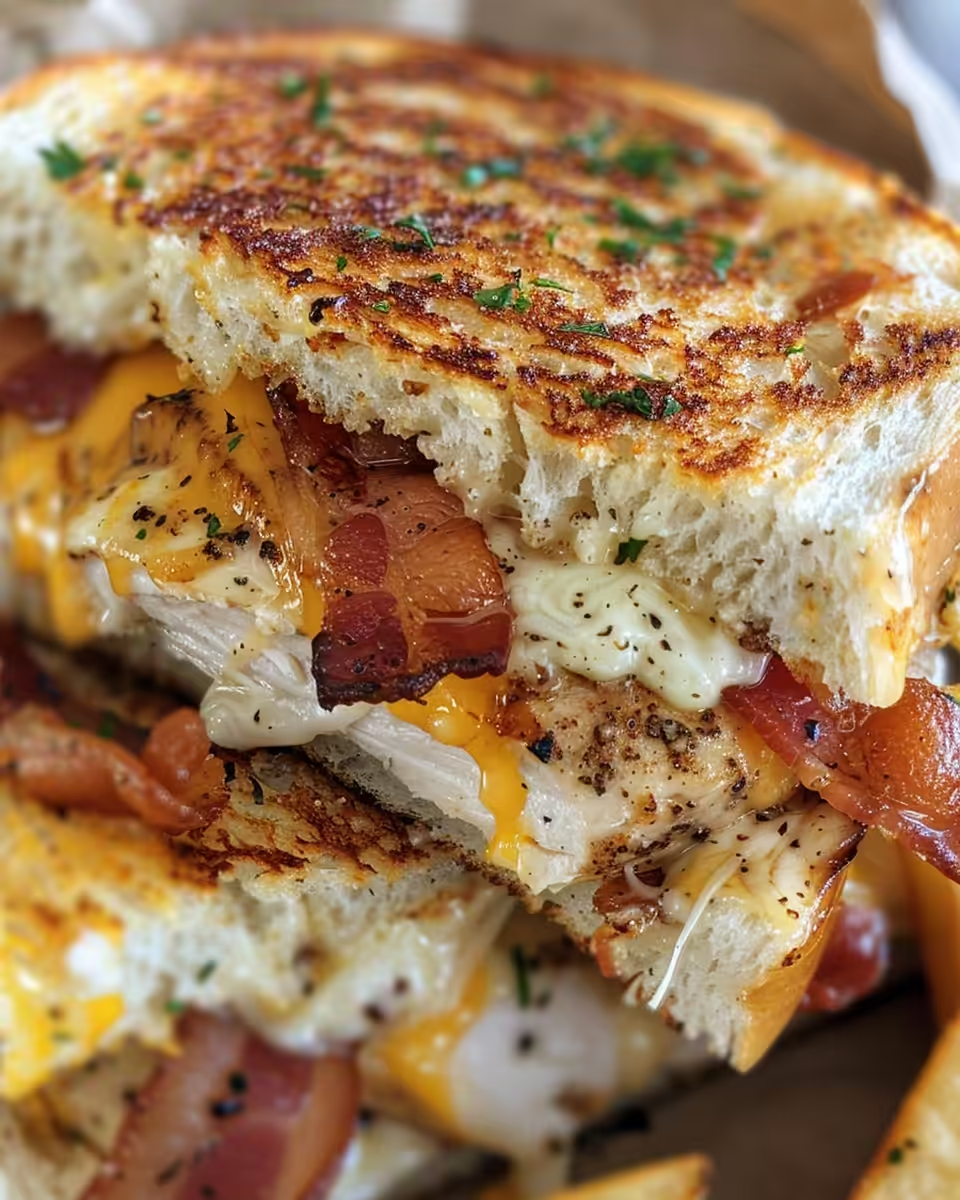
Your teeth sink into a warm sub layered thick with melty cheddar and tangy ranch cream. The crispy bacon snap cracks delightfully with every chew. It’s that kinda combo that just makes you close your eyes and say mmm.
The chicken’s tender and juicy, soaking up all the surrounding flavors but never losing its own identity. Fresh tomato and lettuce bring a cooling, fresh balance that stops this feast from feeling too heavy or greasy.
You remember what simple food can do to brighten a day. This sub isn’t just a sandwich, it’s a reminder that quick and easy can still be delicious and kinda fancy with a little love from your pressure cooker and oven team.
Keeping Leftovers Fresh and Ready
Wrap leftovers tight in foil or plastic wrap and pop them in the fridge. They’ll stay good for about 2 days but taste best when eaten sooner.
If you wanna get fancy, put each half in a sealed container with a piece of parchment paper in between so they don’t stick. It keeps the fresh tomato and lettuce separate till next time.
When reheating, use the oven or toaster oven to bring back that melty cheese and crispy bread. Skip the microwave if you can ’cause it tends to get soggy fast.
The FAQ Section You Actually Need
- Can I use raw bacon instead of pre-cooked? Yeah you can but you'll need to cook it first or add extra bake time. Pre-cooked just makes things faster.
- Is it okay to use regular sandwich buns instead of sub buns? Sure! Just keep an eye that smaller buns might get kinda overwhelmed with the layers.
- Can I swap chicken for turkey or ham? Totally! Whatever you got on hand works great with ranch and bacon combo.
- How do I keep the lettuce from getting soggy? Always add it fresh right after baking and avoid putting too much ranch on that layer.
- Can I make this recipe ahead of time? Yep, you can prep all layers then cover tightly and bake when ready. Just add fresh veggies after baking.
- What if I don’t have an oven? You can try heating subs in your pressure cooker on saute mode or even in a skillet covered with a lid till cheese melts and bun warms.

Pressure Cooker Chicken Bacon Ranch Sub with Marinated Tomatoes and More
Equipment
- 1 Baking sheet
- 1 Oven
Ingredients
Main ingredients
- 2 foot long sub buns ready to soak up all those flavors without falling apart
- 8 ounces sliced chicken perfectly sized to cover the buns evenly and stay tender
- 4 ounces bacon 8 pre-cooked strips
- ⅓ cup ranch dressing brings tangy creaminess to every bite
- 8 slices sharp cheddar cheese everything needs a melty cheese layer
- 1 ripe tomato sliced thin for that juicy, fresh pop post-bake
- ½ head Boston lettuce washed and crisp for that cool crunch
- to taste salt and pepper for seasoning
- a dash garlic powder if you want a little extra zing
- as needed Butter or olive oil to lightly toast the buns in the oven
Instructions
Instructions
- Preheat oven to 350°F.
- Cut the foot-long subs in half lengthwise. Lay 'em flat on a baking sheet.
- Spread the sliced chicken evenly on the bottom halves of your subs.
- Lay down those bacon strips over the chicken. Slather the ranch dressing over the bacon.
- Cover with the sharp cheddar slices.
- Pop the tray into the hot oven for about 15 minutes or until cheese is melted and bubbling.
- Slice up that tomato and rinse your Boston lettuce.
- Top subs with fresh tomato and lettuce.
- Close the subs and slice them in half before serving.