The pressure builds and you start counting down minutes until you eat. It kinda feels like waiting for a train, but instead of wheels, you got steam ready to burst loose. That little valve hiss is your timer telling you some good stuff is happening inside the pot. Sometimes it’s hard not to get distracted by the excitement!

You catch the smell wafting out even before you open the lid. It’s a mix of tangy cheddar melted with fresh herbs and that comforting scent of warm bread baking. This is the kinda bread that pulls you into the kitchen with a smile. You know it’s gonna be worth the wait.
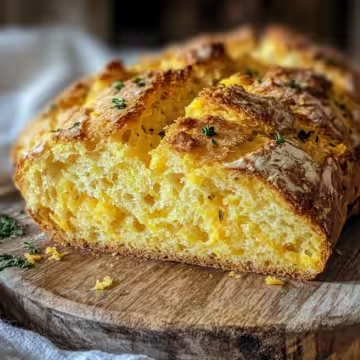
Then you finally let go of the pressure. The natural release lets the flavors settle just right. With a tender pull, you slice into the loaf, seeing those golden edges and soft crumb inside. That first bite? Oh dang, it’s just the cozy, cheesy, herby bread you were hoping for.
The Real Reasons You Will Love This Method
- Pressure cooking soda bread means you get the same great crust and soft center, but way faster than the oven alone.
- It locks in moisture so you don’t get dry, crumbly bread that flakes apart too quick.
- You don’t gotta babysit it almost at all. Just set the timer and listen for the valve hiss.
- The natural release step lets your bread finish gently so it stays fluffy inside without drying.
- This method brings out extra flavor in the cheddar and herbs because of how the heat and steam work together.
What Goes Into the Pot Today
- 2 cups all-purpose flour: the base that holds everything nice and soft inside.
- ½ teaspoon baking soda: helps your bread rise and get that classic soda bread texture.
- 1 teaspoon baking powder: works with baking soda for a tender crumb.
- ½ teaspoon kosher salt: balances all the flavors and brings out the cheddar bite.
- 2 tablespoons finely chopped fresh herbs: I love thyme and parsley but you pick your fave.
- 4 ounces medium or sharp cheddar cheese, diced small (about ¼-inch): packs flavor with every bite.
- 1 cup buttermilk: adds tang and moisture so this is no dull loaf.
- 1 large egg: binds the dough and gives a nice rich texture.
- 1 tablespoon melted butter: for extra tenderness and richness.
- ¼ cup pinenuts: adds a subtle crunch that’s a really pleasant surprise.

Walking Through Every Single Move
Step one you gotta do is gather all your ingredients and preheat your pressure cooker pot if it needs heating before adding dough. This helps get the baking started right.
Then mix your dry ingredients in a big bowl. That means whiskin’ together the flour, baking soda, baking powder, and salt good so it’s all evenly spread.
Next toss in those herbs, cheddar bits, and pinenuts. Stir them in gently so they don’t break up but get spread nice throughout your mix.
In a separate bowl, mix your wet stuff. Whisk the buttermilk, egg, and melted butter till they look smooth and kinda silky.
Pour the wet mix into the dry and fold everything together just until combined. Don’t overdo it cuz over stirring makes bread tough and dense.
Lightly flour a surface and turn your dough out. Knead gently for just a few times to bring everything together into a round loaf.
Place the dough in your pressure cooker on a trivet or heat safe plate, put the lid on, set to pressure cook high for about 20 minutes. Once timer’s up, let the pressure build down naturally for a bit, you know that lovely slow release. Finally, quick release any leftover steam to open it up safely. When you slice into that warm loaf its like a soft, cheesy hug.
Easy Tweaks That Make Life Simple
- Swap fresh herbs for dried if that’s what you got. Just use about a tablespoon and stir right in.
- If you don’t have pinenuts, chopped walnuts or pecans work dang good too.
- Use pre-shredded cheddar cheese instead of dicing to save chopping time.
- Mix dough directly in the pressure cooker pot if you don’t want more dishes. Just make sure it’s clean and dry first.
What It Tastes Like Fresh From the Pot
Right outta the pot you catch a sharp cheddar aroma layered with soft herbal notes. The crust has a golden shine, crisp but not too tough. It kinda crackles gently when you press it.
The inside is warm, tender, and full of little melted cheese pockets that surprise you with every bite. The herbs sneak in subtle hints, not overpowering but just right to make you wanna keep eating.
And those pinenuts? They add a soft crunch that’s unexpected and real nice with the smooth richness of the bread. Eating this fresh, you sense every texture and flavor playing off each other like a little party in your mouth.

Your Leftover Strategy Guide
You got leftovers? No worries, this bread stays pretty good a day or two on the counter wrapped lightly in a towel or paper bag. This keeps the crust from getting soggy too quick.
To keep it longer you can pop it in the fridge in an airtight container or wrapped tight with foil or plastic wrap. It’ll last 3 to 4 days that way, better than just out in the open.
For longer storage, slice and freeze your bread in freezer bags. When you wanna eat it, just toast or warm slices right from frozen. This keeps your bread tasting fresh like it just came out of the pot.
The FAQ Section You Actually Need
How do I know when the bread’s done? Check for a golden top and use a toothpick in the middle. If it comes out mostly clean with a few crumbs you’re good. If wet dough sticks, it needs more time.
Can I use different cheeses? Yep! Try gouda, monterey jack, or even a mix. Just dice or shred them small so they melt well inside.
What if I don’t have buttermilk? Mix 1 cup milk with a tablespoon lemon juice or vinegar and let it sit 5 minutes. It works real good as a substitute.
Why does soda bread call for baking soda and baking powder? The soda reacts with buttermilk for rise while powder gives a little extra fluff and tenderness to the crumb.
Should I always use natural release? For bread, natural release is best since it lets the dough finish gently. Quick release right after might make it dense or tough.
Any tips for kneading dough? Keep it light and gentle. You're just bringing it together, not making pizza dough. Overkneading makes your loaf tough, so don’t press too hard.
Looking to try dishes with a cheesy twist like this? You might want to check out our Cheesy Taco Sticks recipe, which offers a quick and fun snack option packed with melty cheese and bold flavors. For a comforting pasta dish, our Enchilada Pasta blends traditional Mexican enchilada flavors with creamy cheese and pasta, perfect for family meals. If you enjoy baking with herbs, the Mozzarella Stuffed Rosemary Parmesan Soft Pretzels bring herbs and cheese in a delightful soft pretzel form you’ll love.
Expand your dinner repertoire with these tasty, cheese-filled recipes that complement your newfound soda bread skills!
Cheddar Herb Savory Irish Soda Bread
Equipment
- 1 Mixing bowl Large
- 1 Pressure cooker Electric, set to high pressure
Ingredients
Main Ingredients
- 2 cups all-purpose flour
- ½ teaspoon baking soda
- 1 teaspoon baking powder
- ½ teaspoon kosher salt
- 2 tablespoons finely chopped fresh herbs such as thyme and parsley
- 4 ounces medium or sharp cheddar cheese diced small (about ¼-inch)
- 1 cup buttermilk
- 1 large egg
- 1 tablespoon melted butter
- ¼ cup pinenuts
Instructions
Instructions
- Preheat your pressure cooker pot if needed before adding dough.
- In a large bowl, whisk together flour, baking soda, baking powder, and salt until evenly combined.
- Add the chopped herbs, diced cheddar, and pinenuts. Stir in gently.
- In a separate bowl, whisk together the buttermilk, egg, and melted butter until smooth.
- Pour the wet mixture into the dry mixture and fold together just until combined.
- Lightly flour a surface and knead the dough gently a few times to form a round loaf.
- Place the loaf on a heat-safe trivet or plate inside the pressure cooker.
- Cook on high pressure for 20 minutes, then allow to release naturally for 10 minutes.
- Perform a quick release to finish, then carefully remove the bread.
- Cool for 20 minutes before slicing and serving.