You catch the smell through the steam vent and suddenly you are starving. It’s that deep caramel scent wafting out that makes your mouth water real quick. You remember last time how this cake turned out all golden and luscious, and dang, you’re itching to dig in again.

Inside the kitchen, you spot the loaf pan sitting ready, lined with parchment paper that’s just waiting for the batter. The pressure cooker waits too, all set to do the heavy lifting for you. You recall how the valve hiss signals the beginning of the steam rush—that’s your cue this thing’s working its charm.
You think about all the times you fussed over oven temps, but now? With the pressure cooker, things go fast and come out tender with less guesswork. The top warms up nicely and that quick release you do at the end keeps everything perfect. You’re kinda glad you found this way to make a Basque cheesecake without the usual oven hassle.
What Makes Pressure Cooking Win Every Round
- Pressure cooking speeds up baking without drying out your cheesecake.
- The steam cues inside the pot keep moisture locked in for that creamy texture.
- Quick release lets you control how fast the cooking stops, keeping that tender pull perfect.
- It’s all contained inside one pot so you got less clean up afterwards.
- Consistent heat means your cake cooks evenly, no more guessing or burnt edges.
Pressure cooking ensures your Basque cheesecake stays moist and evenly cooked, unlike traditional methods that can create uneven edges. To master this, try different release methods like slow release described in our pressure cooker tips and tricks and discover the science behind consistent heating for perfect desserts.
All the Pieces for This Meal
- 1¾ lb full fat cream cheese bars (or 1 lb 12 oz), softened—you gotta check the foil marks for oz.
- 1 cup granulated sugar for that sweet, fluffy base you’re aiming for.
- 4 large eggs to keep everything rich and hold your cake together.
- 1⅔ cup heavy cream makes it smooth and creamy inside.
- 1 teaspoon vanilla extract (optional) for just a whisper of flavor that rounds things out.
- ¼ teaspoon salt to balance all that sweetness.
- ¼ cup all-purpose flour to give the cheesecake a nice slight structure.
- 9x5-inch loaf pan lined with parchment paper that hangs over the edges for easy lifting.
- Spatula to smooth out your batter before it goes in the cooker.
- Your trusty pressure cooker with a reliable valve for quick release and slow release options.

Your Complete Cooking Timeline
- Preheat your pressure cooker on the bake setting or a similar low-heat function if it has one. Meanwhile, line your loaf pan with parchment paper—make sure it’s got overhang for easy cheesecake lifting.
- Beat cream cheese with a hand mixer on medium speed until smooth and creamy. You gotta scrape down the sides to avoid lumps.
- Add in granulated sugar and continue beating till it looks fluffy and fully mixed. This sweet layer sets the base for your cake.
- Crack eggs in one at a time, mixing well after each addition so your batter stays silky with no clumps.
- Pour heavy cream, vanilla extract if you want, and salt into the mix. Blend until everything is silky and combined with a slight shine.
- Sift all-purpose flour over the bowl and fold it in gently just till the batter is smooth. No overmixing here, you want everything just glued together nice.
- Pour batter into your lined loaf pan and smooth the top with a spatula. Pop the pan in your pressure cooker. Lock the lid, set it to high pressure, and cook for about 30 minutes. Use slow release at the end to keep the texture tender and watch for that gentle valve hiss as the pressure lets out.
Smart Shortcuts for Busy Days
- Use room temp cream cheese from your fridge an hour before starting so the mixing goes way quicker.
- Mix eggs and sugar separately first to speed up the beating process when you add the cream cheese.
- Line your loaf pan with foil over parchment for even faster clean up.
- Prep your ingredients the night before and keep them ready in bowls so you just dump and mix.
- Freeze leftover cheesecake slices separately so you can thaw just what you need later—no waste.
That First Bite Moment
You lift that first slice out with the parchment paper overhang and can’t help but admire that dark, caramelized top. It’s almost like the cheesecake is wearing a golden brown crown. The smell, dang, it fills the room with cozy sweetness.
As you take your first bite, the cream cheese richness hits your tongue smooth and mellow. It’s creamy but with just a little tender pull, that balance you’ve been chasing in every cheesecake. You can kinda feel the dense softness melt away with every chew.
The finish is slightly burnt on top like a good burnt caramel flavor that isn’t bitter but adds a deep cozy twist. You remember you might have ruined other cheesecakes before, but this method? It just works real good every time, and you’re gonna want seconds for sure.

Smart Storage That Actually Works
- Wrap your cooled cheesecake tightly in plastic wrap before popping it in the fridge. Keeps it moist and stops it from grabbing weird fridge smells.
- Use an airtight container if you got one big enough to hold that loaf pan slice upright. It keeps the finish safe from drying out.
- For longer storage, freeze slices individually wrapped in parchment, then in a zip bag. Thaw in the fridge overnight for best texture.
- Don’t forget to bring chilled cheesecake to room temperature before you dig in again. It loosens that tender pull just right.
What People Always Ask Me
- Can I use low fat cream cheese? Nah, full fat gives you that creamy texture that’s key for this Basque style. Low fat changes consistency and flavor a lot.
- Do I have to use the loaf pan? You can try smaller pans but the loaf pan size keeps cooking times spot on in your pressure cooker.
- What’s the deal with quick release vs slow release? Slow release lets steam escape gently, keeping the cheesecake from cracking and keeps it tender. Quick release is okay if you’re in a rush, but slow release is best for texture.
- Can I add flavors like lemon or espresso? Totally! Just add zest or a tiny shot of espresso with the cream cheese mix before cooking.
- How long can I keep leftovers? Wrapped well, cheesecake lasts up to 5 days in the fridge. Beyond that, freezing is your friend.
- What if the top isn’t dark enough? If your pressure cooker doesn’t brown the top like an oven, you can pop the cheesecake under a broiler for a couple minutes to get that classic Basque burnt look.
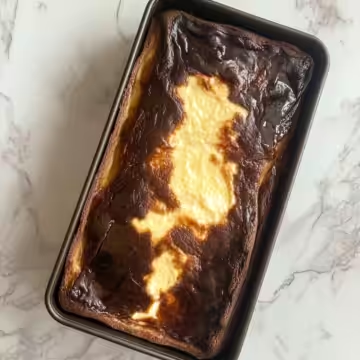
Loaf Pan Basque Cheesecake In The Pressure Cooker
Equipment
- 1 loaf pan 9x5-inch lined with parchment paper
- 1 pressure cooker with valve for pressure control
- 1 spatula to smooth batter
- 1 hand mixer or stand mixer
Ingredients
Main ingredients
- 1¾ lb full fat cream cheese softened, check foil marks for oz
- 1 cup granulated sugar
- 4 large eggs
- 1⅔ cup heavy cream
- 1 teaspoon vanilla extract optional
- ¼ teaspoon salt
- ¼ cup all-purpose flour
Instructions
Instructions
- Preheat your pressure cooker on the bake setting or a similar low-heat function if it has one. Meanwhile, line your loaf pan with parchment paper—make sure it’s got overhang for easy cheesecake lifting.
- Beat cream cheese with a hand mixer on medium speed until smooth and creamy. Scrape down the sides to avoid lumps.
- Add in granulated sugar and continue beating until fluffy and fully mixed.
- Crack eggs in one at a time, mixing well after each addition.
- Pour in heavy cream, vanilla extract (if using), and salt. Blend until everything is combined with a slight shine.
- Sift the flour over the bowl and fold in gently just until the batter is smooth. Don’t overmix.
- Pour batter into your lined loaf pan and smooth the top with a spatula.
- Place the loaf pan into the pressure cooker. Lock the lid, set to high pressure, and cook for 30 minutes.
- Use slow pressure release at the end to keep the cheesecake texture creamy and tender.
- Allow to cool fully on the counter, then refrigerate for at least 2 hours or overnight before serving.